What you will learn from this article:
Active Directory is a directory service that organizations can use to organize their resources. The Active Directory network is comprised of elements called Active Directory objects. These objects represent resources that are a part of the network. There are several types of objects such as a user, computer, printer, and more. In this article, we will take a look at what an Active Directory user object is, what are its properties, and how you can create, modify, and delete a user object.
What is an Active Directory User object?
An Active Directory user object, or an AD user object, represents a real user who is part of an organization’s Active Directory (AD) network. It is a leaf object, which means it can’t contain other AD objects within itself. The user may be an employee of the organization such as a manager, HR person, or an IT administrator who generally has elevated permissions over other users. A user object is a security principal, which means that it would have a security identifier (SID) apart from a global unique identifier (GUID). A user object in AD has attributes that contain information such as canonical name. first name, middle name, last name, login credentials telephone number, manager who he or she reports to, address, who their subordinates are, and more.
Adding a user to the network can be done using the Active Directory Users and Computers (ADUC) console. For example, Joshua is a new employee in an organization, and the administrator needs to provide him access to various resources of the organization. All that the administrator has to do is create a user object through the Active Directory users and Computers console, and then assign access permissions to the user object representing Joshua. Depending on the permissions the administrator assigns to the user object, Joshua’s would get his access to the resources that is necessary for him.
Mandatory AD user object attributes
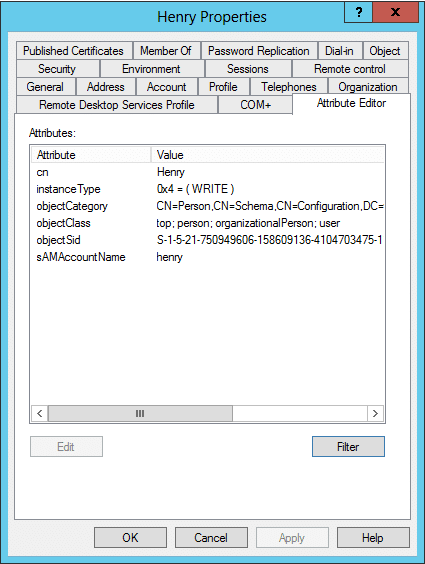
Every object has a set of mandatory and optional attributes. The values for the mandatory attributes are required for the successful creation of the object, and cannot be empty. For example, the mandatory attributes for a user object are:
- cn: The distinguished name of the user object that is used to uniquely identify this object in the AD network
- ObjectCategory: This is a single value property that contains the distinguished name of either the object class this user object belongs to, or the distinguished name of one of its superclasses.
- Objectclass: The distinguished name of the object class that this user object belongs to.
- sAMAccountName: The pre-Windows 2000 logon name of the object. This is a naming attribute that is also used to identify this user object in the network uniquely.
These attributes are unique across a domain, and they are used to identify the objects across the domain uniquely.
How to view the mandatory attributes of the user object?
- Go to Start -> Administrative Tools, and click on Active Directory Users and Computers. The ADUC console will open.
- Expand the console tree, and right-click on the user object whose mandatory properties you wish to see.
- From the menu that pops up, click Properties.
- A dialogue box will appear that shows the user object’s properties. Select the Attribute Editor tab.
- In the attribute editor tab click the Filter button. A submenu with a list of attribute types will pop up.
- From the menu, choose Mandatory.
- The mandatory attributes of the user object will be shown.

There are also other attributes that are optional such as telephoneNumber, Manager, and more. An AD user object can be created without these attributes. These optional attributes are used to provide additional information about the user that the user object references.
How to create an AD user object?
- Go to Start -> Administrative Tools, and click on Active Directory Users and Computers. The ADUC console will open.
- Right-click on the console tree.
- From the menu that pops up, choose the option New.
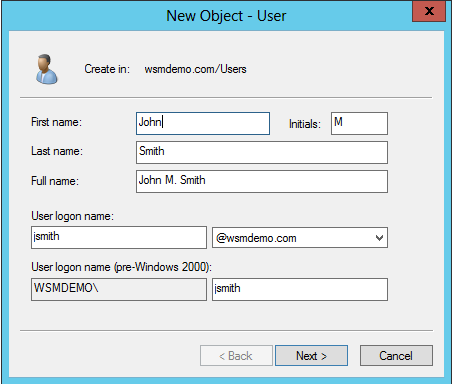
- From the list of objects that appear in the menu, select User. An object creation wizard will appear.
- In the wizard window, enter the value for various attributes of the user object, and then click Next.
- In the next page of the creation Wizard, enter the password for the user account. In this section, you will also be given the provision to configure the password policies for the user object.
- After you have set the password and configured the password policies, click Finish.

A new AD user object will be created, and it can be located on the ADUC console tree in its respective container.
How to modify an AD user object?
To modify a user object in AD, you can perform the following steps:
- Go to Start -> Administrative Tools, and click on Active Directory Users and Computers. The ADUC console will open.
- Expand the console tree, and right-click on the user object you wish to modify.
- From the menu that pops up, click Properties.
- A dialogue box will appear that shows the various properties of the object.
- Navigate through the various available tabs, and make the necessary changes.
- Once done, click Apply, and then click OK.
- The modifications will hence be reflected in the properties tab.
How to delete an AD user object?
To delete a user object in AD, you can perform the following steps:
- Go to Start -> Administrative Tools, and click on Active Directory Users and Computers. The ADUC console will open.
- Expand the console tree, and right-click on the user object you wish to delete.
- From the submenu that pops up, click Delete.
- Click Yes to confirm the deletion.
- The AD user object will be deleted from the network, and it will not be shown on the console tree.
Properties of an AD user object
To understand the AD user object and its various attributes better, you can explore the user object’s properties dialogue box. To open the user object properties dialogue box, follow the below given steps:
- Go to Start -> Administrative Tools, and click on Active Directory Users and Computers. The ADUC console will open.
- Expand the console tree, and right-click on the user object you wish to modify.
- From the menu that pops up, click Properties.

The various attributes are categorized under different tabs based on their commonalities. Let’s take a look at some of the tabs.
General tab
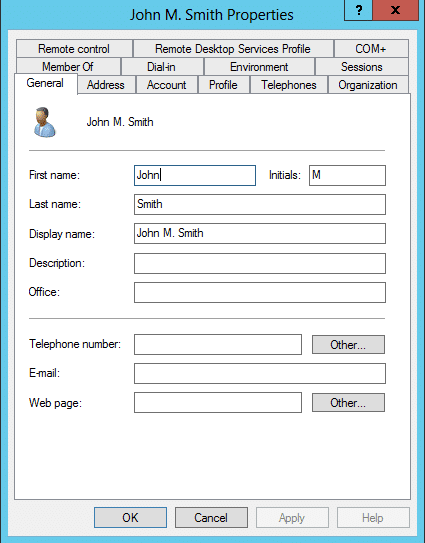
The general tab of the user properties window allows you to configure the basic details such as name and contact details for a user. The values for the name fields are very important as they make up the value for mandatory attribute cn. (The combination of the values in the 3 name fields makes up the value for cn.
| Label | LDAP Name | Example |
| First name | givenName | Isabella |
| Last name | Surname | Swan |
| Display name | displayName | Isabella.e.swan |
| Initials | initials | E |
| Description | description | Temporary |
| Office | physicalDeliveryOfficeName | Symantec |
| Telephone number | telephoneNumber | 9159917893 |
| Others (other telephone numbers) | OtherTelephone | 9994327893 |
| Bella | ||
| Web page | wWWHomePage | Bellabingo.com |
| Others (other web pages) | url | Bellaeswanblog.com |
Address tab
The address tab of the user properties window allows you to configure a set of attributes that describe the user’s physical location for contact purposes.
| Label | LDAP Name | Example |
| Street | streetAddress | Park street |
| P.O.box | postOfficeBox | 1234 |
| City | L | Louisville |
| State/province | st | Kentucky |
| Zip/Postal code | postalCode | 1240 |
| Country/region | co | India |
| Country/region | c | United states |
Organization tab
The organization tab of the user properties window allows you to add organization specific user details such as his company, department, designation, managers, subordinates etc.
| Label | LDAP Name | Example |
| Title | title | Business analyst |
| Department | department | departmentX |
| Company | company | companyY |
| Manager (name) | manager | AdvUser-1 |
| Direct reports | directReports | Leena |
Profile tab
The profile tab of the user properties window allows you to configure the user profile, logon scripts, and home folder details for the user object. It is beneficial when you have to allow your user access the same environment and data irrespective of the machine he logs in from. Let’s take a look at some of its attributes.
User Profile: A user profile carries environment settings, documents, music, and other data that are specific to the user. The profile is stored in the server and can be accessed by the user from anywhere.
Logon scripts: Using these scripts, you can configure what tasks will be executed when the user logs on. With these scripts, you can perform various tasks such as mapping network drives, Installing and setting a user’s default printer, updating virus signatures, updating software, and more.
Home folder: Home folders are similar to profiles as the data in it can be accessed from anywhere. The difference is that they don’t carry the working environment or customizations. Instead, they are just shares that can be accessed from anywhere. It is usually used when there is no sufficient disk space available on the local machine.
| Label | LDAP Name | Example |
| Profile path (User profile) | profilePath | \\sushma-root.com\roamingProfiles\roaminguser2 |
| Logon script (User profile) | scriptPath | Eb.bat |
| Local path (home folder) | homeDirectory | sushma-temp\Homefolder\Roaminguser2 |
| Connect (home folder) | homeDrive | Z: |
| To (home folder) | homeDirectory | \\sushma-temp\Homefolder\Roaminguser2 |
Sessions tab
The sessions tab of the user properties window allows you to configure the timeout and reconnection settings for a user.
End a disconnected session – Allows you to configure the duration after which a disconnected session should end.
Active session limit – Allows you to configure the duration after which an active session should end.
Idle session limit – Allows you to configure the duration after which an idle session should end.
Disconnect from session – if you choose this option the session will be disconnected once the session limit is reached.
End session – if you choose this option the session will be ended once the session limit is reached.
Allow reconnection – This section allows you to configure the reconnection settings for a user’s session
From any client – choosing this option allows the user to reconnect from any client to his session
From originating client only – choosing this option allows the user to reconnect from any client to his session
Note: Disconnecting from a session means dropping the connection with the server without logging off whereas ending a session means disconnecting and logging off.
The values related to this Tab are stored in a LDAP attribute called userParameters.
Accounts tab
The account tab of the user properties window allows you to configure the user account specific details such as the name with which he can log on, the machines in the network he can log on to, account access duration in weekdays or hours, password configurations, account expiry dates, and more.
The name fields in the account tab (User logon name and pre-windows 2000 name) are very important as they make up the user credentials. The account options also have to be carefully configured to ensure the security of the network resources and the account itself.
| Label | LDAP Name | Example |
| User logon name | userPrincipalName | Bella |
| User logon name(pre-windows 2000) | SAMAccountName | Bella |
| Logon hours | logonHours | 9 am to 5 pm, from Monday to Friday |
| Log on to | logonWorkStation | All computers |
| Unlock account | lockoutTime(indicates when the account was locked) | unchecked |
| Account options | userAccountControl | User must change password at next logon |
| Account expires | accountExpires | Never |
Member Of tab
The names of the groups to which a user belongs can be seen in the Member Of tab of the user properties window (The user can also be added to new groups or removed from the ones he belongs to by using this tab).
The Values (or group names) are stored in a multivalued LDAP attribute called memberOf.
Note: When required the primary group of a user can also be changed using this tab. The name of the primary group does not appear in the memberOf attribute. The SID of the primary group is displayed separately in an attribute called primaryGroupID.
Security tab
The security tab of the computer properties window allows you to configure access permissions on the user object. The security tab allows you to grant or deny permissions to other groups and users over the user object.
- In the “group or user names” section you can choose the group or the user to whom you would like to deny or allow permission.
- You can use the check boxes available in the “permissions” section to configure (allow or deny) the permissions the other users and groups will have over the user object.
Advanced button
Clicking on the advanced tab opens another window with the following tabs:
- Permissions – Using this tab, you can view the other permissions that were assigned to the user by inheritance and also which of the object’s permissions are inheritable. This tab also allows you to add permissions or edit existing permissions.
- Auditing – Using this tab, you can view and configure the types of object accesses to be audited.
- Owner – Using this tab, you can view and configure ownership rights over the user object.
- Effective permissions – This tab displays a list of permissions. Each permission has a check box to its left indicating whether it is effective or not.
Active Directory User Objects Best Practices
- When you use Active Directory Users and Computers to view the property sheet for an object, the Security tab, which displays the Active Directory permissions assigned to that object, is usually not visible. Choose Advanced Features from the View menu to make this tab visible.
- If you have resources such as shared folders or printers on computers that are not running Windows 2000, you must manually publish information about these resources in Active Directory if you want users to be able to locate and access them through Active Directory. You do this by adding the appropriate type of object for that resource to Active Directory and having it point to where the resource is located on the network.
- When you create a new Active Directory object, you usually use a wizard to specify values for the important attributes of the object. You can specify other attributes after the object is created by opening the property sheet for that object.
Active Directory Object Attributes


