What you will learn:
Nesting groups in Active Directory (AD) allow for better control in managing access to resources in the AD network. Group nesting also makes it easier to assign permissions across multiple domains and greatly reduces the hassle for IT administrators. However, the process of nesting groups can quickly get confusing owing to the various types of groups in AD and their scope. So, in this article, we will learn what group nesting is, the types of groups and their scope of nesting, how you can nest a group, and the best practices for group nesting to avoid confusion and hassle.
What is group nesting?
AD group nesting, simply put, is the process of putting one group inside another group. Nested groups inherit the permissions and privileges of the group they are put under, and hence this makes privilege administration easier. However, not all groups can be nested within other groups, and this depends on the types of groups in AD, and their scope of nesting.
Types of groups based on their scope
There are three types of groups in AD based on their scope, which are as follows:
- Domain local groups: Domain local groups are the groups where permissions are assigned. This is because these groups have the highest scope in terms of who can be members of this group. Any group or account from any domain or trusted domain (Except domain local groups from other trusted domains) can be a part of this group.
- Global groups: These groups can contain accounts and other global groups from the same domain. These groups are used to collect and group multiple objects from the same domain, and these groups can then be placed inside domain local groups.
- Universal groups: Universal groups come in handy when you want to group objects from different domains in the same forest. This way, you can assign privileges to objects that span multiple domains at once without having to assign the same privileges each time on every domain.
The following table contains the various groups and their scopes
| Group type | Members who can be part of this group | This group can be a member of |
| Universal groups | Accounts, global groups, and other universal groups from any domain within the same forest | Other universal groups in the same forestDomain local groups or local groups on computers in the same forest or trusting forests |
| Global groups | Accounts and other global groups from the same domain | Universal groups from any domain in the same forestOther global groups from the same domainDomain local groups from any domain in the same forest or any trusted domain |
| Domain local groups | Accounts and global groups, from any domain in the same forest or any trusted domainsUniversal groups from any domain in the same forestOther Domain Local groups from the same domain | Other domain local groups from the same domainLocal groups on computers in the same domain (except built-in groups that have well-known SIDs) |
How to create nested groups in AD
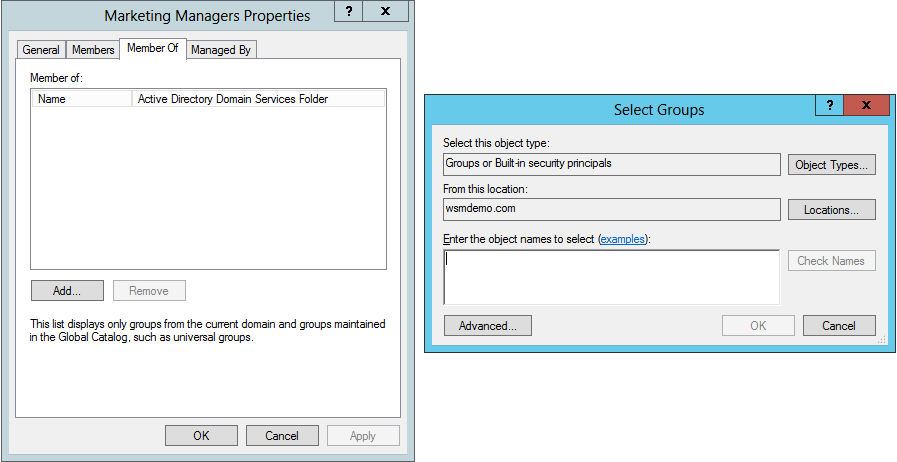
Nesting groups in AD follow the same process as adding member objects to a group. Here’s how you can nest a group into another group:
- Go to Start -> Administrative Tools, and click Active Directory Users and Computers.
- Navigate to the group that you want to nest inside another group.
- Right click on the group and click Properties.
- In the pop-up window, click the Member Of tab.
- Click Add to search for the group you want this group to reside in.
- You can search for the group by typing out the name and then clicking Check Names
- Click the group you want in the list that is shown, and then click OK.
- Click OK again. Now, the Member Of window will show the selected group name under the list of objects this group is present in. Click OK.
The group has successfully been nested inside the desired parent group.

Nested groups best practices
There are two best-practice processes depending on the number of domains that are involved. The key difference is the involvement of universal groups.
Process 1:
If the users are part of the same domain, here’s how nested groups and permissions assignments are done:
- Add the user accounts and computer accounts that you want inside global groups.
- Add the global group to a domain local group.
- Assign permissions to the domain local group.
Accounts -> Global groups -> Domain local groups -> Permission assignment
The user and computer accounts in the global group will thus inherit the permissions assigned to the domain local group.
Process 2:
If the users are part of multiple trusted domains or trusted forests, then you use make use of the universal groups in the process. Here’s how the process will now look like:
- Add the user accounts and computer accounts that you want inside global groups.
- Add the global group to a universal group.
- Add the universal group to a domain local group.
- Assign permissions to the domain local group.
Accounts -> Global groups -> Universal groups -> Domain local groups -> Permission assignment
The universal group ensures that users and computers from external trusted domains and forests can be a part of this nested group operation.
Tip to note: Always use the first process for nesting groups in AD unless you have user and computer accounts from external trusted domains or forests to keep things simpler. You can always modify the nested group created with the first process to include a universal group later down the line in case it becomes necessary.


